LongArm Quilting at
LongArm Mastery Practice Quilts
The following Quilt Tops will be needed for you to work on. Bear in mind that these are for practice purposes, so don’t use a top you’ve slaved over, or that is intended as a gift. While many of these tops will be turned into nice, usable quilts, you don’t want to be freaking out about making mistakes when you’re learning new techniques. However, I can’t teach you just using practice fabric, so you will need to provide these tops. I don’t think they will prove too onerous ;-)
For each quilt top, make a backing 6” larger than the top in each dimension.
I hope these descriptions give you ideas for quilt tops to pull from your store or to whip together for your long arm practice. Just remember that they are for practice and don’t spend too long making a really elaborate top that you’ll be afraid to experiment and learn on. You don’t need to follow my exact patterns, just read and understand the purpose and needs of each lesson and go from there.
Lessons 2-4 – First Quilt
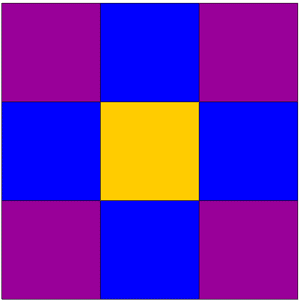
The first quilt should be made up of squares an/or rectangles, fairly large in size, of plain solids or marbles. You will be quilting each set of blocks with a different freehand pattern, and stitching in the ditch around the blocks. Have at least 3 sets of blocks, each set with at least a square foot of area. The design at right, made of 15 1/2” squares, would make a suitable project, and result in a lap quilt you can show off as your first long arm project. Of course you can pick your favorite colors! Other suitable designs would be Trip Around the World, or Kimono Medley by Marge Burkell. Or you can pick any 9-Patch square and make it big. The quilt top should be no smaller than 36” x 12”, and no larger than 45” x 45”, unless you want to lease extra practice time to complete it (which actually isn’t a bad idea).
Pick and practice on paper one freehand design for each set of blocks. One design should be easy; it would fill the purple blocks on the sample. Easy designs from the Freehanding books include:
- Meanderings
1 Basic Meandering
2 Single Loop
14 Basic Leaf
38 Pond Water Meander
- Textures & Fillers
1 Landscape
15 Fish Scales
26 Basic Stipple
Additional designs may be selected from the more complicated patterns to challenge your developing skills, or kept simple but different to bolster your emerging confidence.

Lesson 5 – Following Fabric Motifs
For this lesson, you will be following lines printed on a sheet of fabric. Select a figured fabric such as a large-scale floral or paisley; something with curves and straight lines. Or buy a quilt cheater with a design printed on it, which can be washed out. One yard makes a good size.
Lesson 6 – Freehand Feathers
For this lesson, you will learn to freehand feathers and cables. You need a quilt top similar to the one for your first quilt. Or build one following the pattern in Linda Mae Diny’s Freehand Feathers book; but again to complete that project will probably take some extra time on the LongArm.
Practice your feathers using paper and pen before coming to the lesson.
Lesson 7 – Stitch in the Ditch
For this project, do some raw-edge appliqué of complex shapes combining curves and straight lines, such as hands or teacups. Also include some pieced blocks such as 9-patch blocks or star blocks, with the seams pressed towards the center. Make sure there are some diagonal seam lines.
Lessons 8-9 – Pantograph Quilting
Here you want a top that will work well with an all-over quilting pattern. A simple watercolor quilt might be appropriate, or any pattern with no clear differentiation between foreground and background.
Lesson 10 – Specialty Threads
Pick any quilt top you have that would benefit from some glitter!
Lessons 11-12 – Pattern Quilting
Again, a quilt top like your first quilt would make a suitable project. Or buy a cheater. Another possibility is to make a whitework quilt, or to follow an Amish quilt pattern. Anything that gives you room to try pattern motifs.
Lesson 13 – Hartley Fence
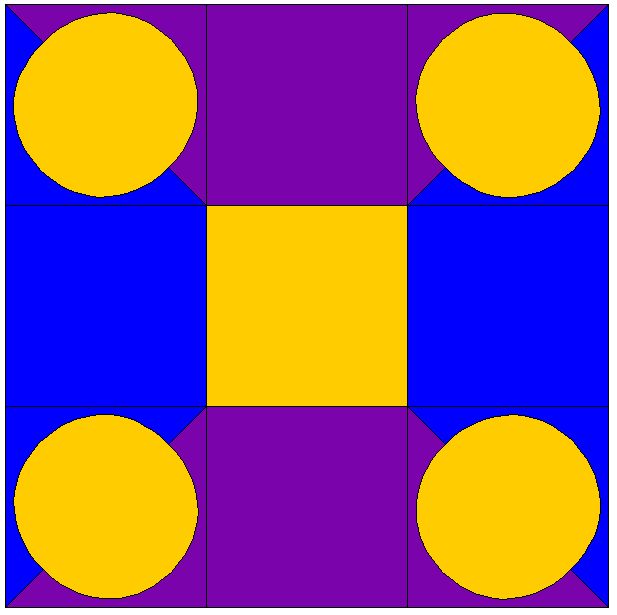
Large circles pieced or appliquéd onto split squares make a good project. You want something with large circles and diagonal lines. The design at right would be suitable; again, the squares should be 15 1/2”. Again, this makes a lap quilt.

